A small photo session, when shooting your Märklin models
Updated 06.10.2013
When I make photos of my Märklin models, I do like this:
The camera:
There are many cameras available. If you have no favourite, the selection
may be difficult. It's always a question to select between a compact
camera and a SLR camera. The SLR (Single Lens Reflex) camera has the advantage that you see the
motive "live" in the viewfinder, seen through the lens. Many
cameras have an adjustable LCD screen, as on m compact camera. I am very
found of the adjustable screen, so I often use the compact camera before my SLR
camera for model railway photography. But, normally I use my SLR camera.
Anyhow, you need a good camera with possibilities for manual aperture adjustment. For web
use the resolution doesn't have to be very big, as 72 dot per inch is the same
resolution as the PC screen. Now a days all cameras have a very good
resolution.
Light:
I do have a couple of 500 Watt photo lamps and a 1000 Watt lamp meant for movie
shooting, but for practical reasons I do not
use them (I would have to rig them up in the living room). I do not use sunlight
either, as this often becomes very hard with high contrast. In addition, the
blue sky can add a blue colour to the photos.
I find the best light when the weather is slightly overcast, but with bright
enough light to make shadows. I use one or more white screens (white paper or
cardboard, or the bottom of the bigger white Märklin boxes) to reflect light to
the object, to fill the shadows. We have a conservatory connected to our
house, with glass walls on three sides and a transparent roof, perfect for my kind of
photography.
Flash:
Normally, a flash gives a very hard light with strong shadows and high contrast.
If shooting from a distance, with a 100 mm or 200 mm lens, a flash may work, but
not at close-ups. I have made a very simple and cheap solution for this,
which I use frequently.

I use a piece of white paper, in my case A4 format, and stick to the flash as a
tube, as wide as possible, with two small pieces of tape. This softens the
light quite a bit, to reduce the hard shadows and high contrast. It is of
course possible to buy different flash diffusers in the camera shop, but when not at hand, the
white paper will do a good job. A little bit of printing on the paper does
not harm. The general idea is to get a bigger and softer light source than
only the small flash opening.
In my case, I also flip down a built-in small wide angle diffuser in the flash, so it covers
angels
down to 14mm focal length, to spread the light further, inside the paper.
This photo was shot with the above setup:

Focal length 100 mm, distance from the front of the lens (lens hood not
included) to the subject only 30cm; 1/60 second, f/13
Manual focus, manual setting of shutter speed and aperture. The photo is
cropped a little bit and reduced in size to 800 pixels width.
Focal length:
On my compact camera
I adjust the zoom to max. focal length,
28,8 mm (the 35 mm film equivalent
is 140 mm). That way you have a very good control of the background and the perspective.
When using my SLR I normally use my 100 mm macro lens.
Focus setting:

Many compact cameras have a macro setting. It may be an advantage to use
this. If in doubt, make several test shots and check if the subjects are in
focus. Some cameras have a manual focus possibility. In some cases
(e.g. of the subject has a very low contrast) this is an advantage, but modern
auto focus normally does the job very well. This way also close-ups may be
good.
Aperture and depth of field:
Set the aperture
to f11 or f16, or
as small as the camera permits. On my compact digital camera (Canon Powershot G6)
only f/8.
By selecting the smallest possible opening (highest f-number), the
depth of field is maximum, but a longer
shutter opening time is required. The higher the aperture number (f/4, f/5,6,
f/8, f/11, f/16), the smaller the aperture opening, the better the focus depth.
At normal focus lengths 1/3 of the focus depth is in front of the focus point, 2/3 behind it.
But, at short distances, the ratio is close to 1:1.
Remember that the focal distance is measured from the so called film plane in the camera, not from the
front of it.

Stolen from http://www.dofmaster.com/dofjs.html.
Here you can find a lot of information about this interesting subject.
I also have a digital single lens reflex camera, a Canon EOS 5D. A different world, regarding
aperture, compared with a compact camera. I have a Canon EF 28-200 mm f/3,5-5,6
USM zoom lens, with the shortest focusing distance of 45 cm. When zoomed
to 135 mm actually even a little bit shorter. For model railway
photography, the smallest aperture, f/32, is very good for depth of field.
At 200 mm focal length the aperture is down to f/39. A cheap lens, but think it does
the job very well, compared to the price.
I also have a Canon EF 100mm f/2,8L USM IS macro lens. It has a minimum focus
distance of 310 mm, which gives 1:1 picture size (1x magnification). The
minimum aperture is f/32.
At 310 mm distance and f/32 the depth of field is only from 304 to 316 mm,
totally 12,5 mm only, at f/11 from 308 to 312 mm, only 4,4 mm. I prefer
manual focus at this short distance. The focus distance is measured from
the film plane (or sensor position, inside the camera (may be marked with a
"Ø"-mark), to the subject, not from
the front of the camera or lens.
The depth of field is different between a
compact camera and a SLR. f8 has bigger depth of field, at the same
shooting distance and field of view, than my SLR at f8. I think this has
to do with the sensor size and the distance between the lens and the sensor.
The Canon Powershot G6 has a 7,2 - 28,8 mm lens. This equals 35 - 140 mm
on a
full frame camera, like my Canon Eos 5D. The
crop factor is
140/28,8 = 4,86. The G6 100 mm equivalent is 100/4,86 = 20,58 mm.
Depth of field comparison, using the above mentioned
DOFMaster website:
SLR focal length 100 mm, G6 focal length 20,7 mm (closest in the calculator),
focus distance 40 cm, both cameras at f/8:
SLR: from 39,7 to 40,3 cm, total 0,58 cm
G6: from 38,4 cm (+1,3) to 41,8 cm (+1,5), total 3,41 cm (+ 2,83).
This is only for illustration, as the G6 does not give any accurate focal length
information, only a bar from wide to tele.
Sensor size comparison:
Powershot G6: 1/1,8", 7,176 x 5,319 mm, 38,17 mm2
sensor size
EOS 5D: 35,8 x 23,9 mm (like a 135 format or 35 mm film, so called "full
format" or "FF")
Some examples of depth of field, same focal length in all the photos, and the same focus point, shot with the Canon EOS 5D and Canon EF 28-200 mm lens:
With aperture opening f5,6, 1/10second:
With aperture opening f8, 1/5 second:
With aperture opening f16, 0,8 seconds:
And finally with aperture opening f32, 3,2 seconds:


Sharpness at small aperture openings:
Many tests, and magnification on the PC screen,
shows that the general sharpness of the photo often decreases a bit at smaller
apertures than f/11. Very simplified, this is because the light from the subject
passes through a very small aperture opening in the lens, and have to widen out
a lot in a short distance to cover the whole film or sensor.
This means that a macro photography which requires a good depth of field always
will be a compromise between the depth of field and the general sharpness.
Exposure metering:
Many cameras have the possibility to select three different metering areas; like average,
centre or spot. I select the spot metering to measure the light only on
the locomotive itself, not including the white background. Another way to
check the illumination, if you have a camera with fully manual adjustment, or
the possibility to lock the exposure setting (by pushing the shutter button half
way down or something), is to use a
Gray Card,
e.g. Kodak R-27, to measure the light.
The matte gray surface of the gray card reflects 18% of the light, which is an average of the reflection
from most objects. The reverse side is white and reflects 90% of the
light.
Bracket shooting:
Many cameras have a "bracket setting"; the camera
shoots three frames (some cameras even five); the first frame is shot according to the
exposure meter, the second shot is made one exposure step down and the third shot
is one exposure step up. This can normally be adjusted.
Example: f/8 is fixed, the exposure meter
indicates a shutter time is 1/4 of a second, which becomes the first shot, shot
two is at 1/8 second (half time), shot three is at 1/2 second (double
time). This way it's a better possibility to get a good shot.
I have set my camera so the first shot is under (darker), the second is normal and the third is over (brighter) the normal exposure. I can also adjust how much under and over (from 0 to 2 steps) the exposures should be.
Tripod:
A tripod
is mandatory, as during the above mentioned settings, the shutter opening time may be
up to several seconds. A
self timer
(built into most cameras) or a remote control is very important, to avoid camera vibrations
when squeezing the release button.
In some cases you wish to create special "visions" and need a even
longer shutter opening time.

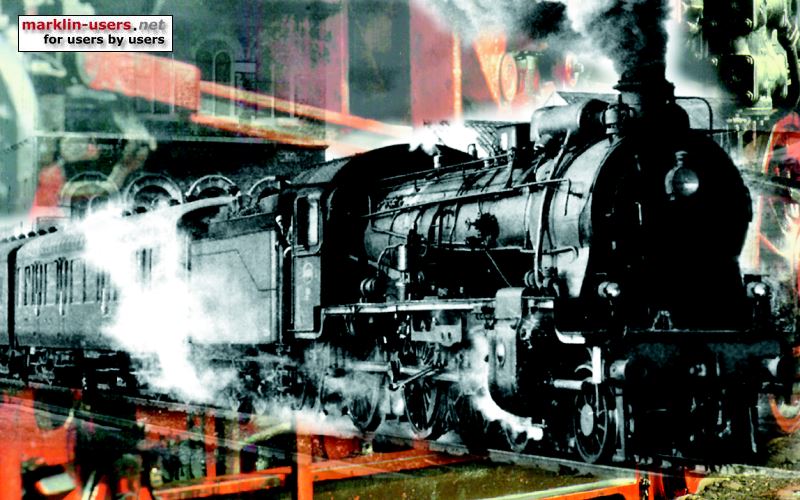
In this example I used
15 seconds shutter opening time, to show the cabin light and the front light. The
aperture is as small as possible on my compact camera, f/8, to get a best possible depth of field. The smoke
generator is on, but the smoke is not very visible due to the long exposure
time.
Film speed or sensor sensitivity, ISO:
We used to say that we should select as low ISO as possible, even at a digital camera. My lowest
is ISO 50. Select the best resolution and the lowest image compression.
But, many sources claim that all digital cameras have a "natural" or basic film
speed, for instance ISO 100 or 200. All other speeds, lower or higher, are
made by an electronic alteration, which will reduce the image quality. The
basic ISO setting is known only for a few cameras.
I normally shoot at ISO 100 or 200.
Background:

I use a white background, as far away from the object as practically possible.
If I had a layout, I would probably use a nice part of the layout as background. In this case
the background, a little bit too close, is the bottom of a Märklin wagon box.
Manipulating the photos:
No matter how lucky you are with the exposure, a minor manipulating of the
picture to get the best final result is normally necessary. A good
"photo manipulating" software is required. For use in web-sites
and in other PC screen medias, 72 dots per inch is adequate, also when used with
video projectors. If the main purpose is for printing or magnification, a
higher solution should be selected.
All the photos in my web site is 72 dpi.
A well known object:
To make sure that several photos becomes as identical as possible, a good idea
is to have one well known object in all the photos, and adjust the photos so
this object becomes identical colour- and light wise in all the photos. In
my case the C-track is the well known object.
Example, my Märklin 3417 NSB 63 2770, the image size is reduced to 72 dpi,
800 x 323 pixels, 284 Kb:

Click on the photo. It is a link to the high resolution photo, 180 dpi, 2991 x 1104 pixels, 3 035 Kb,:
This high resolution photo shows that f8 is not small enough to get a good focus
depth, as the front and the rear of the locomotive is out of focus.
Shoot many frames:
The good thing with a digital camera is that you may take as many photos as you
like, maybe with different settings, and see what is best for your taste and
requirements. It costs nothing to shoot 50 frames and maybe delete 45 of
them afterwards.