This article is contributed by Martin Silz, and describes an alternative
to the usual ways of model railroading. This way you can have the best
of both worlds, the electrical reliability of the Märklin 3-rail track,
the smoothness of DC operation and you can use all your old Märklin
locos with "slight" modifications as well as modified 2-rail
DC locos. A kind of "best of both worlds" approach...
Why change from 3-rail AC to 3-rail
DC system?
Originally being a Märklinist, one will sometimes recognize that 3-rail
AC is a rather limited world and that there is more outside - 2-rail DC.
But there are many Märklin locomotives in your collection at home and
you do not want to sell them (either because you won't get the desired
price, or because you are in love with the Märklin models, or... )
So you think of combining both system. Wagons are no problem as many
manufacturers change the wheel sets at no extra cost with AC compatible
ones when you buy a new wagon. Similar with couplers, thanks to the
standard NEM pocket you can use any coupler that fits.
But there are some problems to combine both systems, technical and
financial problems. You could try to buy rebuilt versions of the DC locos
you want. This is normally rather expensive (approx. 25% more expensive
than the same 2-rail DC model) and some locos are not sold as AC versions.
On the other hand a 2-rail DC loco right out of the box will never run
on a Märklin system.
Some obvious problems with 2-rail DC locos on Märklin tracks
- Both rails are not isolated in the Märklin
system. So how to transport the current to the loco?
- The motor normally is one with
permanent magnet, so it will not be able to cope with AC.
- The inner distance between the
wheels is 14.3mm (NEM) versus 14mm (Märklin)
Solutions to these problems
- Put a slider under the loco and do a
re-cabling inside the loco.
- Either use DC for your power supply
or any kind of (electronic) reversing relay. Let's forget about DCC
for the moment, as I personally want to stay analog.
- Either exchange the wheels or gently
press them to the desired distance.
Nice, short and easy.
Easy?
As always, the devil turns up in the details. Especially the problem 2)
is
a harder one. Electronic relays are rather expensive. And: Especially in
older DC locos there is no room for installing them.
So, what to do?
Why not try 3-rail DC? On Märklin tracks of course. We will not need
the relay for the DC model, so less expensive and no room problem.
Let's see what problems arise from here at the Märklin side
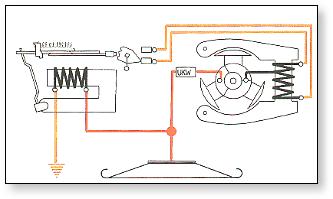
We take a standard Märklin transformer and put a rectifier, a
pole-reversing switch between transformer and track. A standard Märklin
model of the past (3xxx or 33xx) has an all-current-motor, so it will
run as good when fed with AC as it will do with DC. Of course the loco
will run in the same direction, when you reverse the current with the
pole-reversing switch. But of course you can reverse the Märklin loco
by the normal 24V pulse. Märklin locos with Delta module will only run,
if the direction of the current is right. So by reversing the current
the loco will stop. But here also the 24V pulse will reverse the
direction (when the direction of the DC current is correct, of course).
I must confess, that I haven't tested DCC models by now, but I expect
them to show the same behavior as Delta models.
So, basically there are no (real) problems using DC for Märklin
models.
Now the next obvious question pops up...
Why not trying to use the reversing of the DC current for reversing the
direction of the loco?
How do I convert a 3-rail Märklin AC loco to a 3-rail DC loco?
As we saw above, problems arise with Delta (and DCC ?) models. So let's
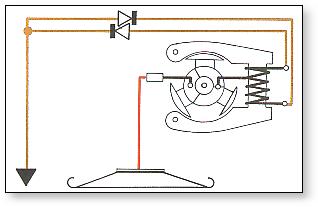
start with old standard models. The reversing relay is to be dismounted.
De-solder the solenoid of the relay from the main soldering point, then
de-solder both cables coming from the motor. Screw off the relay and put
it away. Now solder two diodes (type 1N4001 or higher) to the cables of
the motor, one to each of these cables. Notice that one diode has to be
soldered in one direction (so the ring signing the diode must face the
cable), the other in the other direction (the ring facing the outer
end). Now solder both "open ends" of the diodes together, bend
the legs to a small ring and screw this to the frame of the loco, e.g.
at that place, where the relay was before.
The entire rebuilding will take less than one hour for someone who has
at least some experience in soldering. And it will cost less than one
dollar.
The Märklin AC motor wiring
The motor wiring after the conversion
Now put the loco back to the tracks and try again. The loco will run
with DC (but of course no longer with AC). If you switch the reversing
pole switch, the loco will reverse the direction. So everything seems to
look like normal 2-rail DC.
But there is one difference, and it has to be kept in mind...
If you have a 2-rail DC loco running e.g. running from left to right,
then you take the loco of the tracks, turn it around, put it back to the
tracks, it will still run from left to right. When there are two 2-rail
DC locos on
one track they will always run in the same direction (forget about
Kleinbahn locos for a moment.
Now to the 3-rail DC models. Same situation: Loco runs from left to
right, you turn it around. and now the loco runs from right to left! So
if you have two 3-rail DC locos on one track they can run in opposite
directions (having a "nice" crash).
Can we live with that? I personally do so for more than 15 years.
Back to our more problematic Märklin locos:
- Delta/DCC
- TELEX locos.
I personally do not need the electronics
in a DCC or Delta model. Remember I want to stay analog. So I get rid of
the electronic the same way as with the old mechanical reversing relay -
de-solder and dismount it.
TELEX locos keep there mechanical relay for triggering the TELEX
solenoid, but the cabling of the motor has to be done in a different
way, if you want to reversing the loco by reversing the direction of the
supplying current.
So with a little work, we can have our entire Märklin stock running on
3-rail DC.
------------
Telex wiring will be described
later by the author. (Webmaster's comment)
------------
What have we gained so far?
Having switched to DC on Märklin tracks, we can have a look at
"the new world of DC models".
How do I convert a 2-rail DC loco to
3-rail DC?
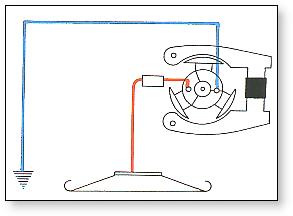
The easiest way is to buy HAMO locos,
remove the current pickup, which contact the wheels on one side, install
a standard Märklin slider instead, and we are done. HAMO locos are
normally about 10 to 20% cheaper than the comparable Märklin AC model
(at least on swap markets here in Germany)!
HAMO motor with slider
But since we now have the entire world of 2-rail DC locos in sight, we
would like to adapt them to our 3-rail DC system too....
The theory of converting a 2-rail DC loco to 3-rail DC is
rather simple...
- Connect both sides of the wheels
electrically (e.g. by soldering a short cable to the current
pickups). And to ONE side of the motor.
- Fix a slider underneath the loco.
- Fix the slider electrically to the
second pole of the motor.
- Ready.
As stated before, the devil is sitting
in the details... All in all, one has to say that there is never an easy
way. This is nothing for total beginners. You should be at least
familiar with basic techniques/concepts of electrical wiring.
AND: Always use the appropriate tools, since it will help you make fewer
mistakes...
The practical issues sometimes make it more difficult...
- Sometimes it is rather difficult to
follow the electrical lines inside a loco. Either because it is done
in a rather complicated way, with lots of cables and platinas, or
because the current pickups are "hidden" deep down in the
frame of the loco, and you are only able to reach them by destroying
(excuse me: disassembling of course) the loco completely. I won't
hide, that here a lot of experience, and trial-and-error will help.
There is no standard way to do this. Every loco is different and you
will always have to examine it carefully to find how to do it best
way.
- Another problem: Many DC locos have
the gear wheels at the middle of the axle, so they are blocking the
slider in a way. Again there is no standard way of coping with this
problem. Best is, to have a look under the loco BEFORE you buy it.
Some clues: Try to use standard Märklin (or Roco) sliders. Try to
screw them to the frame. If no other way glue them to the frame.
Use special self constructed sliders only when there is really no
other way using a standard part.
When rebuilding locos with powered bogies, you may have to "de-power"
one bogie, take off the gears, and fix the slider. The traction
effort will decrease, but normally it will still be enough for
"normal" use.
Have a look for different positions: May be fixing the slider to the
tender is a solution.
Nearly always you will have to cut away some of the lower part of
the frame/chassis of the loco.
It is most important, that the slider has enough room to move up and
down, e.g. when crossing turnouts.
AND: Check, whether the slider has to be mounted electrically
insulated of the frame or not.
I personally have not found any DC model so far, that a slider
could not be fixed under... From the nice draisin from Bachmann, to
the Köf from Roco, from the BR62 from Liliput/Bachmann via the BR
82 from Piko to the 215 from loco etc...
- Fixing the slider electrically to
the motor normally is no big problem, when we reached this point.
More things to consider...
Of course, there are some other
problems, and one should not hide this...
The inner distance between the wheels is 14.3mm with NEM and 14.0mm with
Märklin. Only 0.3mm, that make a BIG difference. NEM locos are most
likely to derail at the frog of Märklin turnouts. Sometimes it is
possible to push the wheels on the axle to 14mm Märklin norm distance.
Carefully of course. Also the flanges of the wheels have a slightly
different shape than Märklin's. Again a thing, which tends to derail
the rolling material.
Many NEM locos are manufactured to run only on large radii, larger than
360mm. The best way is to get rid of Märklin M tracks and use K tracks
(not having tested C tracks so far, but this is due to a different
reason.). Try to avoid the old 424mm K turnouts, and use the new 900 mm
turnouts wherever possible.
So there are some problems, and you have to ask yourself, whether you want to
live with these problems or not. But I think it is worth giving it a
try.
|